Configuring DAZzle for Envelopes
Overview
Single-piece shipping labels, sheets of shipping labels and flyers are easy to setup in Endicia software. But envelopes can be somewhat tricky. This is because printers feed envelopes in a myraid of ways; some feed the envelopes up the center of the paper path, others feed it to one side or the other. Some printers want the envelope fed with flap down, others with flap up. You will see that there are actually 48 feed permutations!
Our DAZzle software can virtually handle any permutation of envelope size and printer configuration. But in some cases it can seem like a daunting task to arrive at the correct layout for a given situation. This tutorial is design to help folks facing this situation.
The Basics
The key to successfully printing on envelopes can be broken down into two main areas. First, you need to select (or define) the correct media size. Secondly, you have to configure the printer feed characteristics and offsets.
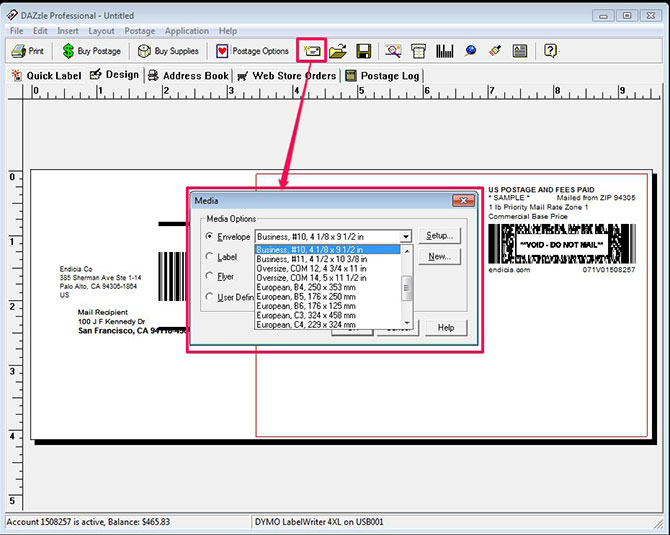
Defining the media is easy. The media drop down box contains virtually every standard US and European envelope sizes - as you can see below:
You can even define a custom media selection -- I'll show you how to do that shortly.
The printer setup is done in the File/Printer Setup dialog.
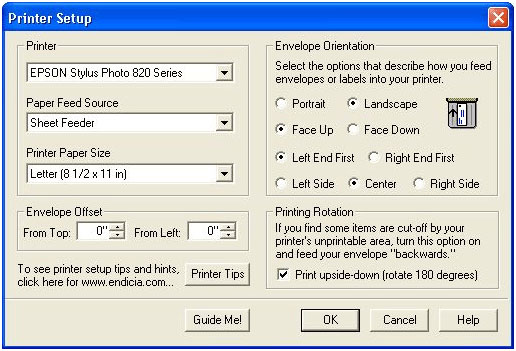
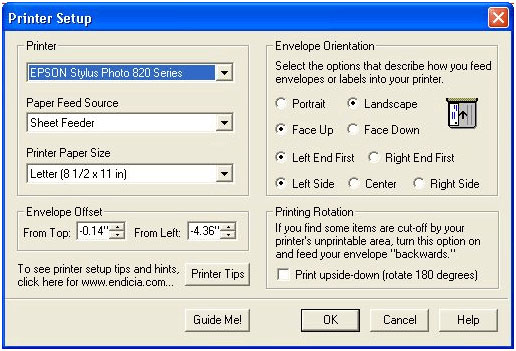
If you look at the Envelope Orientation group in the upper right hand corner, you can begin to see the spectrum of options for feeding envelopes. If you want to have some fun, click the various radio buttons and watch how the little envelope icon in the upper right corner of this dialog re-orients itself! Note that we support 2x2x2x3x2=48 permutations (Portrait/Landscape, Face Up/Down, etc) when you include the final option of printing upside-down!
How to Establish Envelope Print Parameters Yourself
Let's say we are going to print #10 envelopes on a Epson Stylus Photo 820 like the one pictured here:
Assume I'm starting with the Print Dialog settings shown in the previous dialog -- they aren't correct as we’ll see in a moment. Looking at the printer, we see that the paper (and envelopes) feed from the rear, and when narrow media like an envelope is fed, the paper guide slides to the right so that the envelope will feed along the right side of the paper path (facing the printer).
The secret to setting up any envelope quickly is to use a combination of the following two menu items and associated screens:
File/Printer Setup
File/Print Preview
We've already seen the Printer Setup dialog. I personally like to always tell the printer I'm feeding 8 1/2 x 11" letter size paper even though I'm really feeding something smaller.
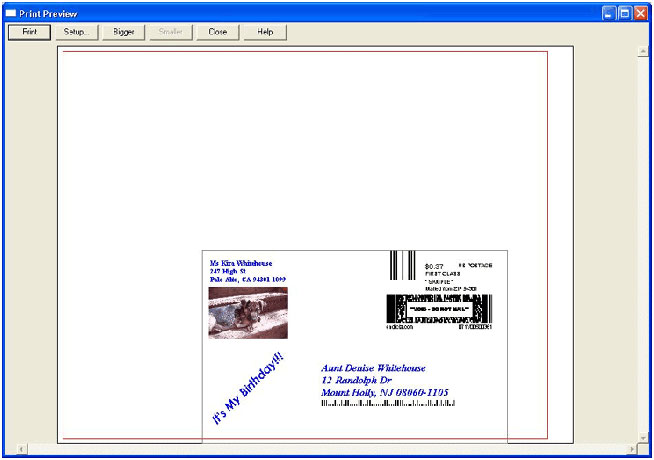
Let's look at the Print Preview based on the settings in the print dialog above:
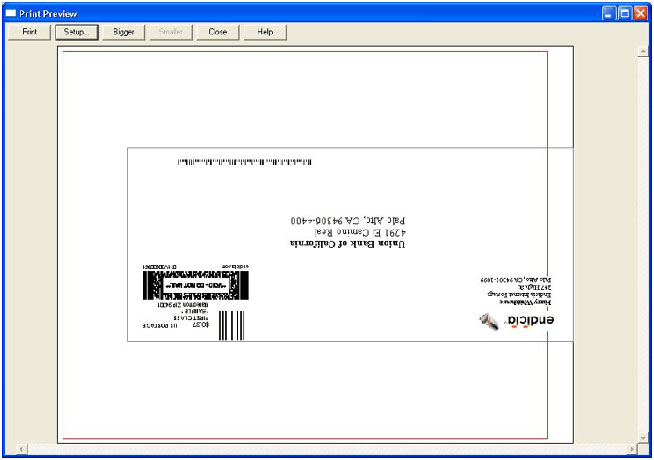
The Print Preview is very revealing; it shows the #10 envelope outline on an 8 1/2"x11" paper sheet. The left side would be the side you feed into the printer. In fact, when starting like this it's a good idea to do a test print on plain 8 1/2 x11" paper just to orient yourself!
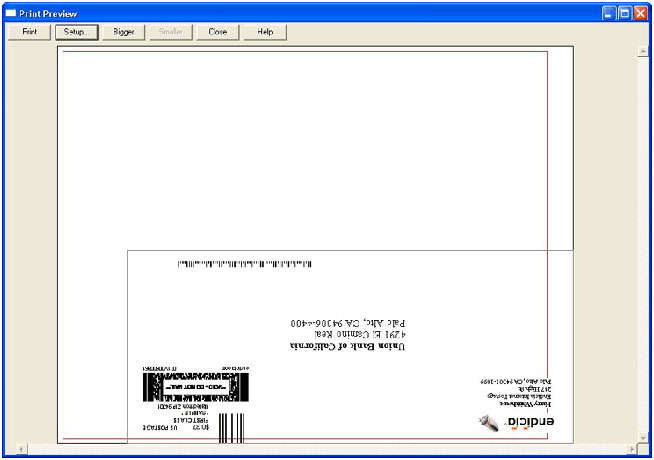
When feeding envelopes with the Epson 820, we need to feed to the right side of the feed path (facing the front of the printer) or left side of the feed path (if we imagine we are behind the printer) so we really need to move the envelope image down on the print preview screen. We can do this easily by pressing the Setup button at the top of the preview screen, and now selecting the Left Side Feed option. The feed options are labeled assuming you are standing facing the printer feed mechanism -- which on this printer is in the back!
Now looking at the Print Preview screen again, we see we are getting closer!!
Now we need to move the envelope image close to the leading edge of the paper -- in other words, to the left on the preview screen. Again we hit the Setup Button and this time we look at the two envelope offset values (from Top, From Left). These can be + or - offsets, measured in inches. It looks like we could use a little over an inch offset in the "From Left" direction. Moving back and forth between the Printer Setup and Print Preview screens, we arrive quickly at a -1.4" offset from Left:

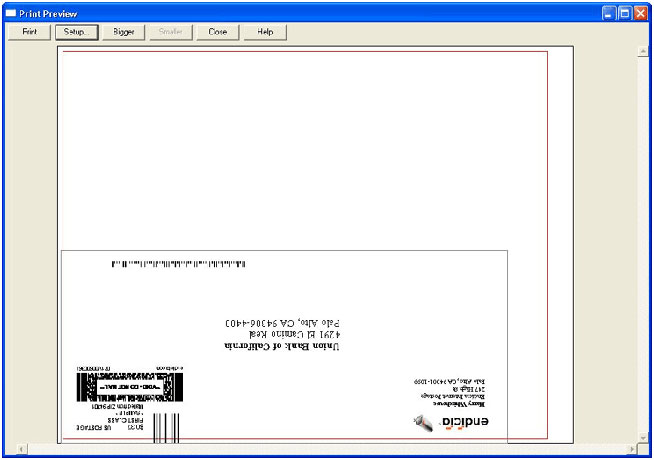
Now, you would think that we have arrived at our final design, but if you try to print now, the software will prevent you because the FIM marking (those vertical black lines near the postage barcode) at the very bottom of the screen is not going to be printed completely to the edge of the envelope. That will cause problems with some of the USPS automation equipment which reads envelope mail. The red line shown in the print preview and in the design screen shows you the printable area of the printer (as reported to the software by the specific printer driver). The printer can't print outside that red line.
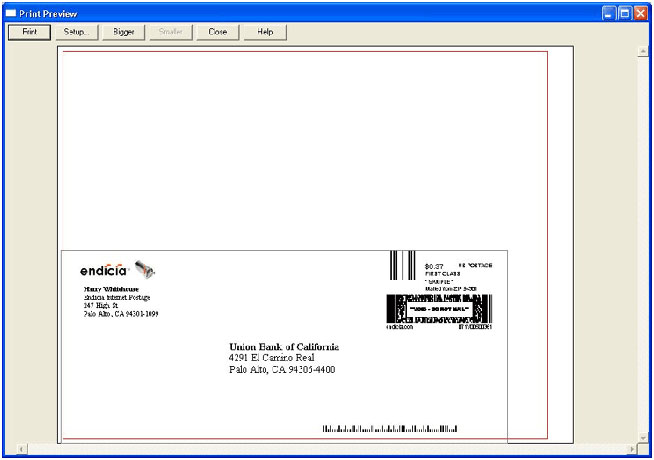
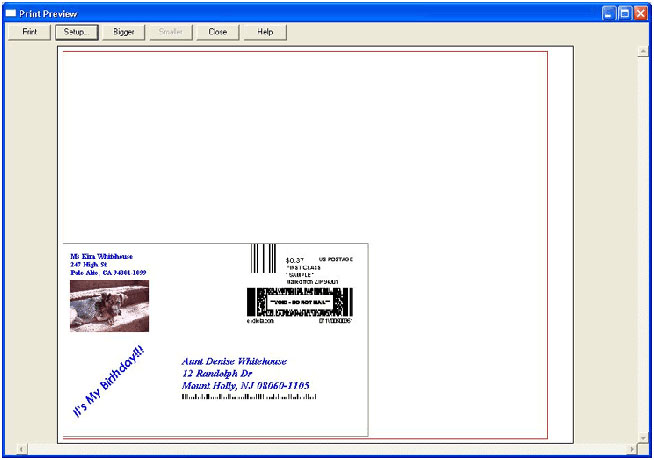
But the fix is easy! We go back to Printer Setup and uncheck the “Print Upside Down” checkbox. Now the print preview looks perfect! Since the FIM is now being printed in the center of the paper path, it won't get truncated because of “unprintable area syndrome.”
Save Your Work
One of the great features of DAZzle is that you can create an unlimited number of layouts. Once you have a layout designed and the printer settings selected, be sure to save that layout with a descriptive name.
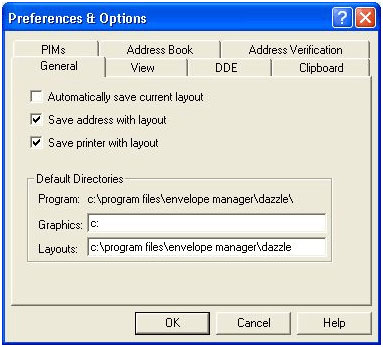
I like to use an option in File > Preferences which saves the printer information with the layout.
When I save the layout file, I give it a really descriptive name like this:
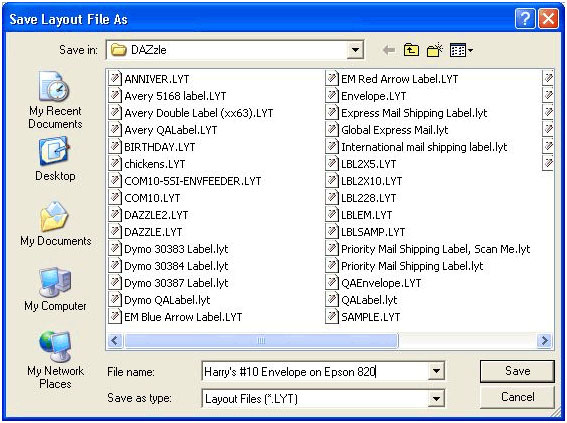
Then, whenever I need to print a COM10 envelope on the Epson 820, I just File/Open that layout and print! In other words, once you set up a printer and media configuration, save it so you'll never have to fuss with it again!
Creating Layouts for Non-standard Envelope Sizes
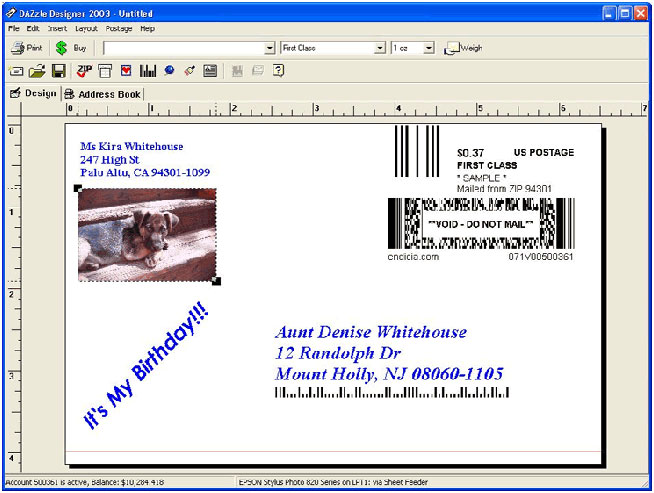
Now let's get a little fancier. Let's say you wanted to send out some birthday invitations and your child selected a 4 1/8" x 6 1/2" envelope/card set. That's not a standard envelope size - but not to worry!
Now select the Layout > Media menu pick to see this dialog:
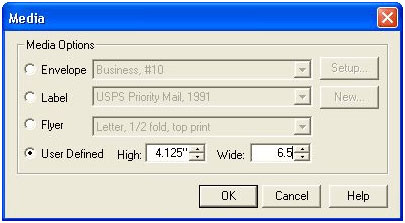
Here we have checked “User Defined” and input the dimensions of the envelope. Per the birthday girl's request, our design has been embellished with a picture of the birthday girl's dog and blue fonts!
Now let's check our File/Print Preview to see how we are faring:
This is going to be easy! We just need to move the image more negative in the "From Left" direction and a bit negative in the “From Top” the direction. A few quick oscillations between the preview and setup screens and we have the final configuration:
Here are the offsets we needed to perfectly position this envelope:
Sometimes you don't know whether to use a + or - offset. When in doubt, try one or the other and look at the preview screen -- you can quickly determine what direction you are going in.
You can see from the title bar, the layout is “untitled” so now I File/Save As and call my new layout something descriptive like “2012 Birthday Card on the Epson 820”.
Now we just pull up our address book of our birthday girl's friends, select them all, and batch print all the invitations!
Switching Between Layouts
You can simply use the File/Open Layout menu item to call up any of hundreds of layouts you have created.
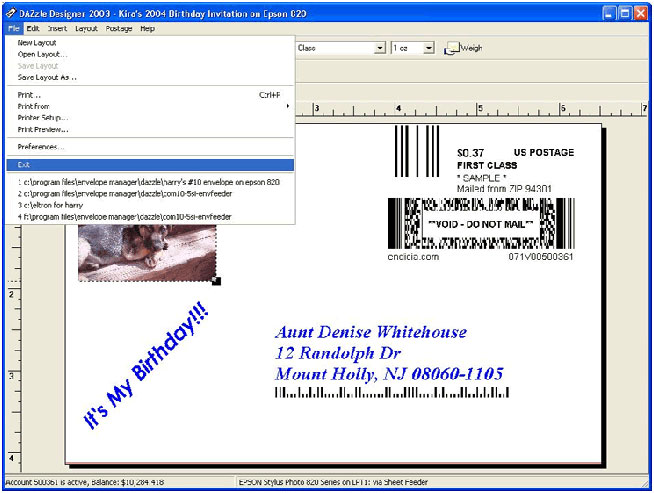
But there is a very nice feature in DAZzle which stores the five most recently used layouts at the bottom of the File menu. Most users have 2 or 3 layouts they frequently use. This is a great way to quickly switch between them.
If you have the “Save Printer Information with Layout” option checked, switching layouts means you are really switching printers too. For instance, the HP printer is a network printer. The Epson is hooked up to my parallel port, and the Eltron is on a USB port. I don't have to worry about any of that when I pull up and use these layouts. I just pull them up, paste or type in the new address, and print!