Making Your Packages “More Visible” in the Improved USPS Tracking System
The USPS has made tremendous strides in package tracking over the past three years. Now, it’s not uncommon to see 7 or 8 tracking events on USPS.COM as packages go from their origin to destination. And USPS has plans to add even more events in the near future. Some of these events are based on human interaction with your package — others are done automatically as packages move through USPS sorting equipment.
In order to obtain good “visibility” for your packages, there are things you should do regarding the positioning of your barcoded labels. I received many of these “hints” from USPS mail carriers at the recent National Association of Letter Carriers convention in Minneapolis. These are folks who scan each and every package as they load them in their trucks in the morning and deliver them to the door of the recipient later that day.
Positioning Your Labels on the Package
You need to know a little about how barcode scanners work to appreciate these hints. You see these scanners every day — at the supermarket, in retail stores and at the movie theater. They project a light on the barcode area and measure the information that comes back. A key here is that the barcode needs to be perpendicular to the light source. And it has to be perpendicular over the entire width of the barcode. Another way of saying this: “Barcode scanners can’t read around corners!”
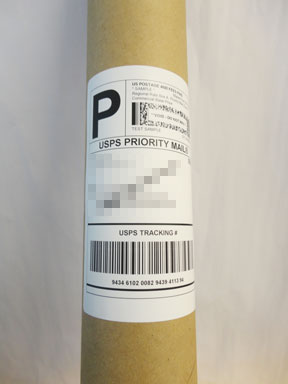
A great example is a mailing tube shown in figures 1 and 2.
Figure 1 shows how you should place the label to obtain a readable configuration. Regardless of how the tube is rotated, there is always a portion of the barcode where all of the bars are perpendicular to the scanner light source.
Figure 2 shows a label which is IMPOSSIBLE to scan!! The scanner can’t “see” around the curvature of the tube so you will never get a read of the tracking number (and thus you will get no tracking events on USPS.COM!)
Figure 1: Proper label placement
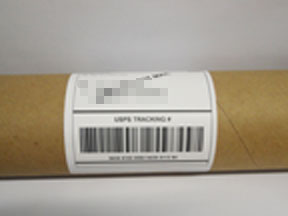
Figure 2: Bad label placement
Now mailing tubes are not all that common, but rectangular packages are. Let’s say you have a rectangular package that is fairly small and doesn’t have a surface large enough to hold the entire label and you need to wrap it around one of the corners.
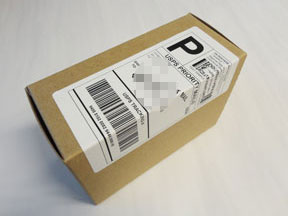
Figure 3 shows a readable configuration whereas Figure 4 can’t be scanned.
In Figure 3 there are two areas where all the bars on perpendicular to the scanner light source — either area will scan just fine.
But in Figure 4 you are asking the scanner to read around a corner — and it can’t!!
Figure 3: Proper label placement
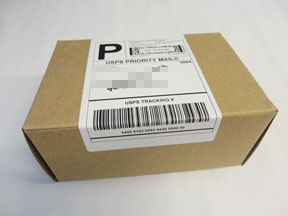
Figure 4: Bad label placement
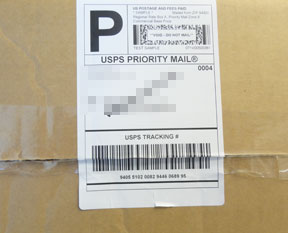
Now here’s another hint. If you can avoid it, don’t place your label over the seam of your box. In transit, the box can get jostled about and sometimes the seam will shift or split a bit. That can rip the label if it’s on top of the seam.
Figure 5 shows a bad situation — where the rip has causes the bars in the barcode to lose their expected spacing. The barcode will generally not read in a situation like this. There are several simple solutions here. First, don’t place the label over the seam if at all possible.
If you must place the label over the seam, place it as shown in Figure 6 so that either the barcode is not on the seam or the barcode orientation is such that even with a label split, there will still be two continuous bar patterns (one on each side of the split). Note that the full barcode height (about 0.75”) is generally not needed for a successful scan — you just need a non-interrupted pattern of bars over the entire length of the barcode.
Figure 5: Bad label placement
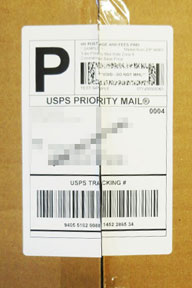
Figure 6: Proper label placement
Tips for Your Thermal Printer
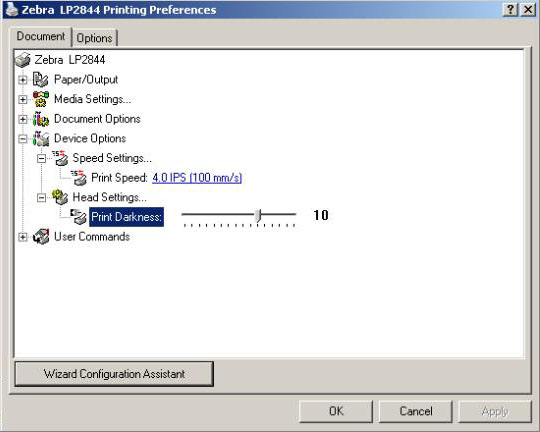
If you are using a thermal printer such as the Zebra series, you can control the darkness of the print by adjusting the amount of heat applied to the printing head. You do that in a Windows operating system by going into the Printer Control Panel and right clicking on the thermal printer. Under Printing Preferences, you should find a dialog like the one below. The “Print Darkness” controls the amount of heat applied to the paper as it moves through the printer. Boost this value up if you feel your labels are “too light”. Don’t go crazy here — use just enough heat to get a readable label. If you run your print head at full tilt, you will have to replace it sooner. Another thing that will impact the darkness of the printing is the age of your paper roll. Keep your stored label rolls in a cool, dark place to enhance their life.
Here’s another hint: Look carefully at your printed label. If you see unevenness or “streaks” moving from top to bottom, you print head might need cleaning or replacement. Normally these print heads last a VERY long time (1 to 3 million inches of label stock!), but if you have a high volume shop and the printer is older, you may need to do some simple maintenance on the print head.
